1. Overview
Every DELPHIN project needs material data. There are several ways to import them into a project. Mostly, materials are selected from a database. There are two databases in DELPHIN, a supplied database and a user database. The user database is empty directly after installation and is built up gradually by the user. These materials can be changed and, if necessary, removed again. The supplied database does not allow the user to change, remove or add materials. This database is based on a central system that serves several programmes (DELPHIN, COND, THERAKLES, NANDRAD). Therefore, it also contains materials that can only be used by certain software products. For example, THERAKLES only requires thermal characteristic values for simulation or COND does not require a moisture storage function. As a result, not all materials can be used for every calculation type in DELPHIN. More about this can be found in the chapter 'Filter by Simulation Type'.
For the selection of materials from the database, a dialogue exists in DELPHIN. In this tutorial, the dialogue of DELPHIN version 6.1.2 is explained. There are two possibilities to call up this dialogue:
-
automatically at the end of the asisstent for a new project
-
manually from the project material list

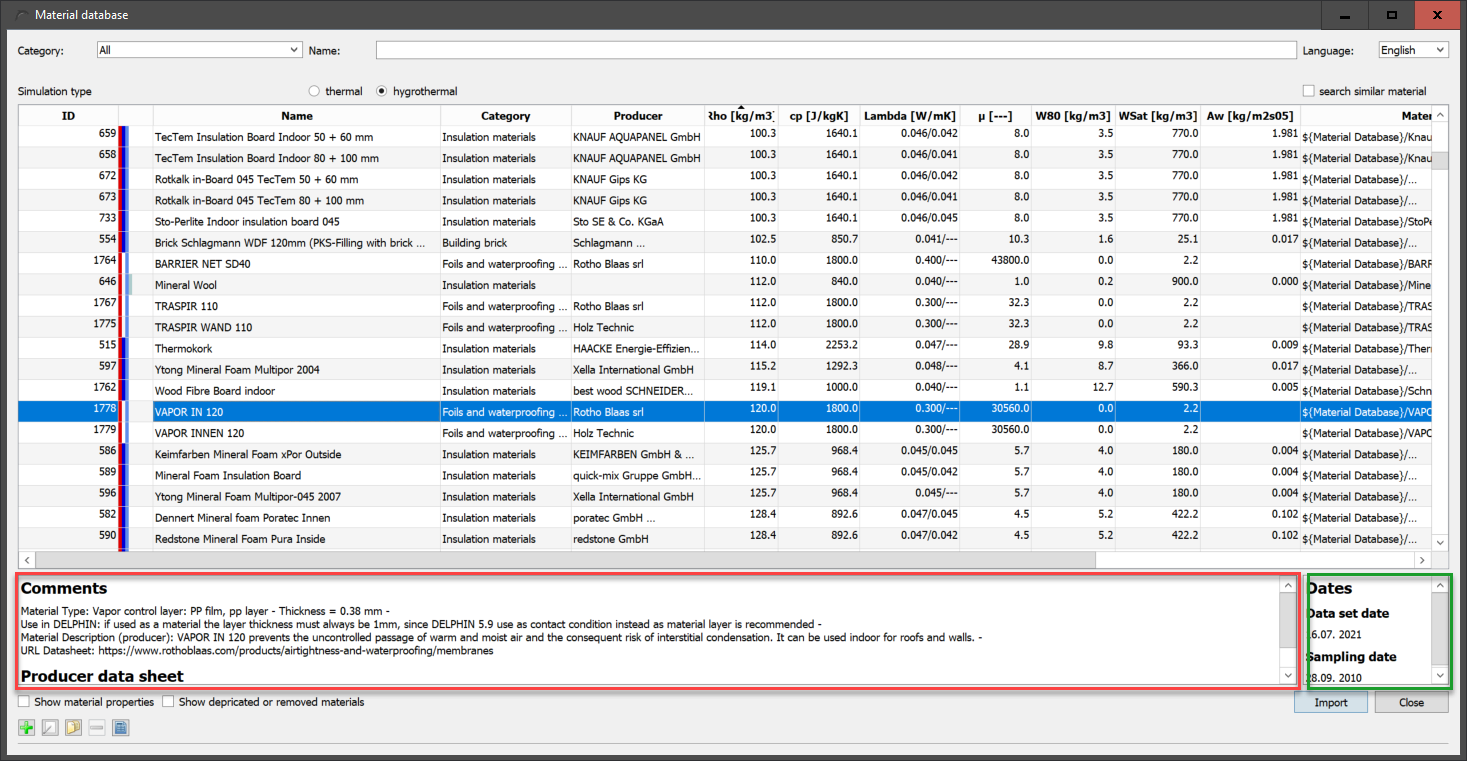
The database dialogue itself shows all materials of the supplied database and the user database at the start. The user materials are marked in colour (see bitumen in the picture below). Only these can be changed or removed.
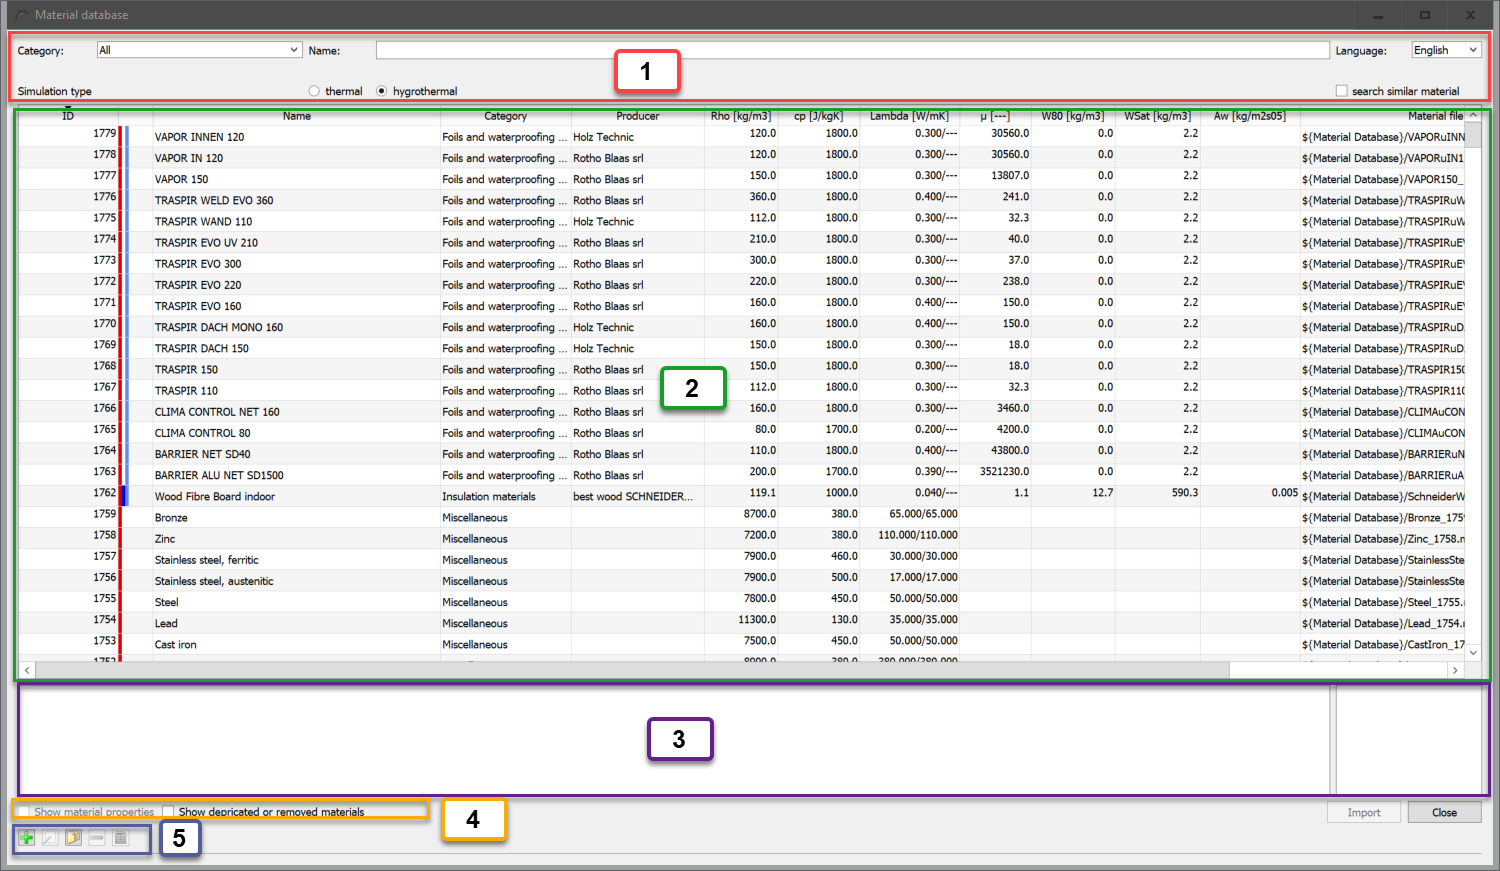
The image shows the dialogue with marking of the following areas:
-
Filter and language setting
-
Material table
-
Remarks and dates for the selected material
-
Buttons for function graphics and obsolete materials
-
Editing of user materials and material view
2. Filter and language
In the upper part of the dialogue there are input elements for filtering the material table. This can be used to narrow down the selection of materials so that it is easier to select the desired materials.

The following filter options are offered:
-
Material category
-
Name and manufacturer
-
Simulation type
-
Materials with similar basic parameters
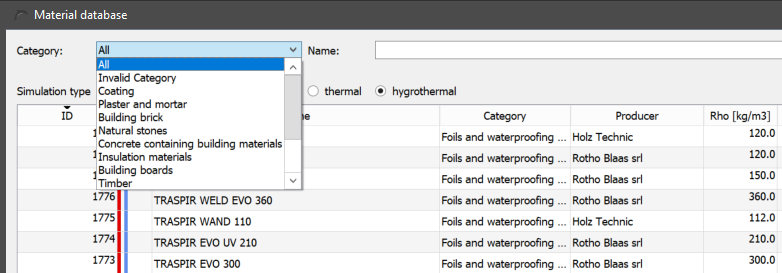
2.1. Material category
This selection box allows classification into the following categories:
-
All - no filtering
-
Coatings - paints and similar
-
Plaster and mortar - also screed
-
Building brick - all types of bricks
-
Natural stone
-
Concrete containing building materials - concretes and aerated concretes
-
Insulation materials
-
Building boards
-
Timber
-
Natural materials - not used
-
Soil
-
Cladding panels and ceramic tiles
-
Foils and waterproofing products
-
Miscellaneous - metals, glass, air, water, etc.
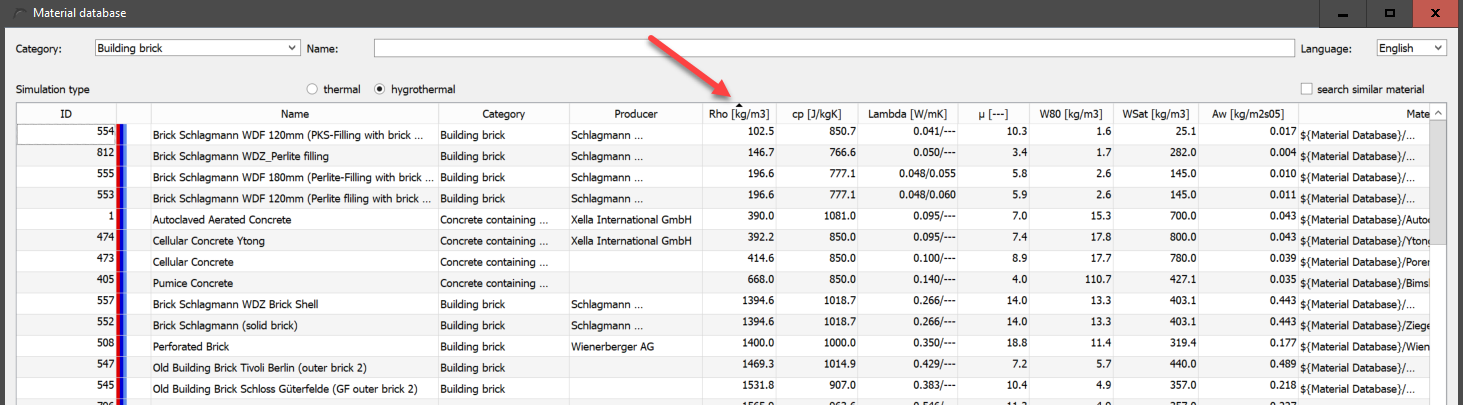
Each material can be divided into 3 categories. The first category is to be considered as the main category. It is shown in the fourth column of the material table. For some materials, an exact classification is difficult. Therefore, up to 2 further categories can be specified for each material. Since version 6.1.2, Delphin filters for all 3 entries. Therefore it can happen that e.g. insulation materials are filtered, but materials of other categories appear in the table. The picture below shows such an example.
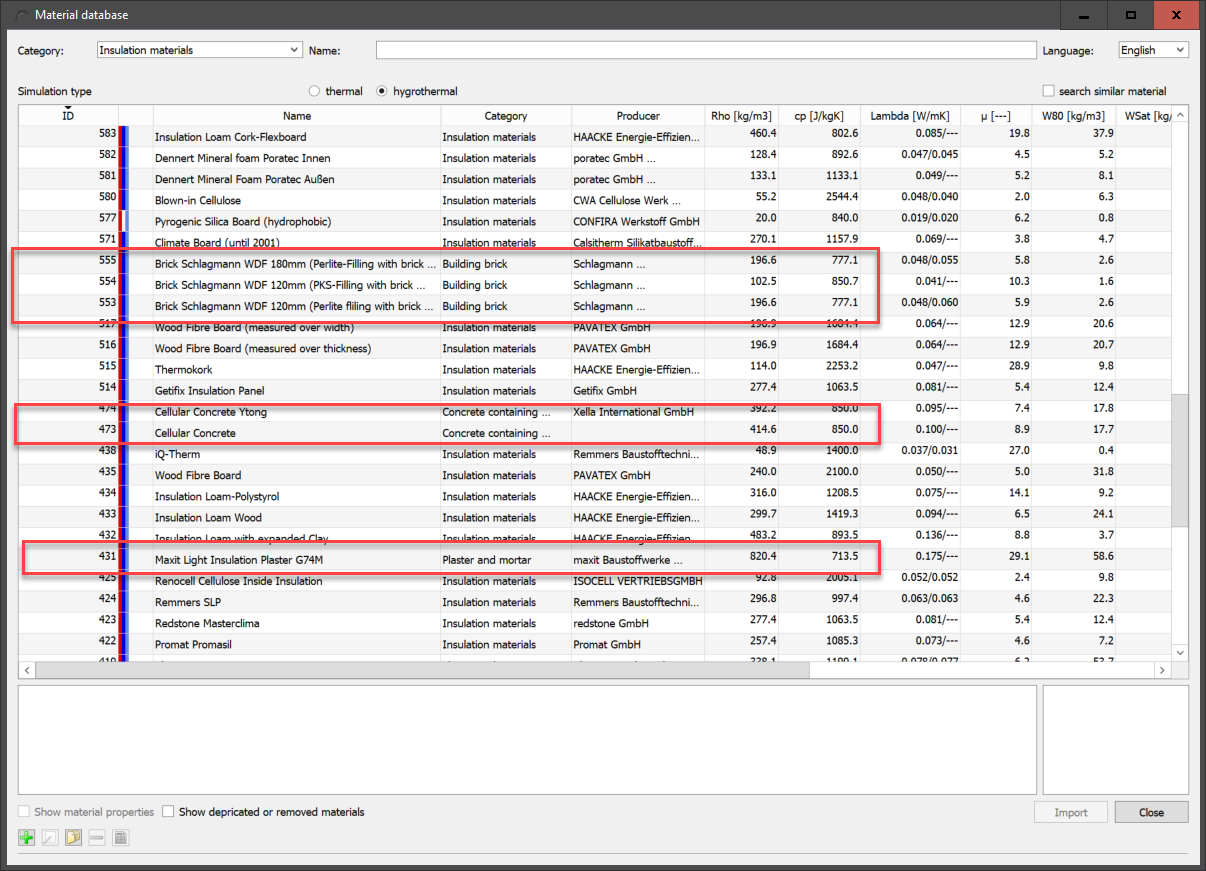
The image also shows materials of the categories 'Concrete containing building materials' (aerated concrete), 'Building brick' (highly insulating bricks) and 'plaster and mortar' (insulation plaster), although 'Insulation materials' is selected as category.
2.2. Name and manufacturer
In the input field 'Name' you can enter texts or parts of texts. The dialogue will then filter out all materials where this part of the text appears in the name or in the manufacturer’s name. Upper and lower case letters are not distinguished. This filter can be used together with the category filter.
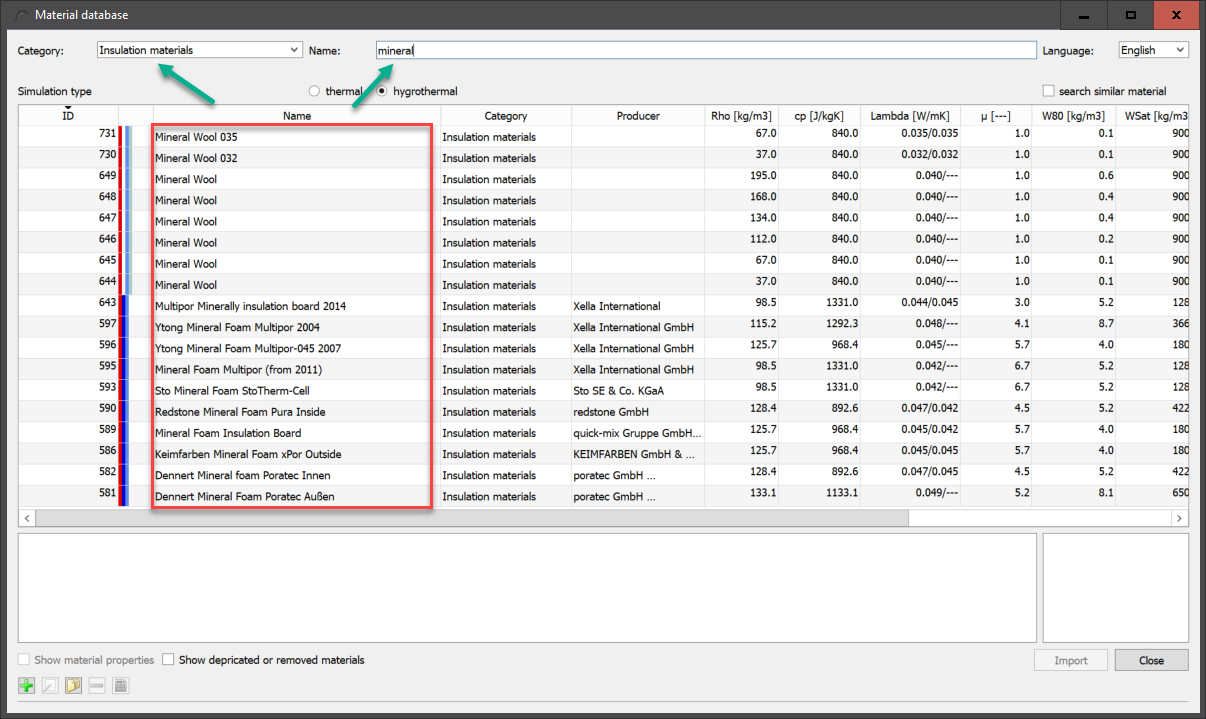
In the image above, the category filter is set to 'insulation' and the text part 'mineral' is entered in the name filter. This means that all insulation materials containing the text 'mineral' are displayed. In the same way, you can also search for materials from a specific manufacturer by entering its name in the search field.
2.3. Simulation type
Here you can distinguish between two types of simulation, purely thermal and hygrothermal calculations. The simulation type currently set in the project is not queried here. Depending on the setting, only the materials that are valid for this simulation type are displayed. In this case, valid means that all necessary transport and storage parameters are available. The database also contains materials, especially from standards such as ISO 10456, which only contain parameters for purely thermal transport. In most cases, the moisture storage function is missing. Such materials are then only listed for the simulation type 'thermal'.
2.4. Materials with similar base parameters
In practical projects it is often the case that only a few parameters of the materials used in the construction are known. In order to simplify the search for such materials, it is possible with this filter to carry out a similarity search by entering a few base parameters. Only materials that are sufficiently similar then appear in the list. The other filters are also taken into account. To activate this filter, the checkbox 'search similar material' must be checked. The following dialogue will appear.

Data for 6 basic parameters can be entered:
-
Rho in [kg/m3] - bulk density
-
Lambda in [W/mK] - thermal conductivity of the dry material
-
µ in [-] - Vapour diffusion resistance factor of the dry material (dry cup)
-
Aw in [kg/m2s0.5] - water uptake coefficient
-
W80 in [kg/m3] - water content at 80% relative humidity
-
WSat in [kg/m3] - water content at effective saturation
In the field 'Min. number' a minimum number of materials to be found can be set. With the button 'Update' the list is rebuilt based on the current setting. This also happens if you click on any other dialogue element. If there is a 0 in one of the parameter fields, this value is not taken into account.
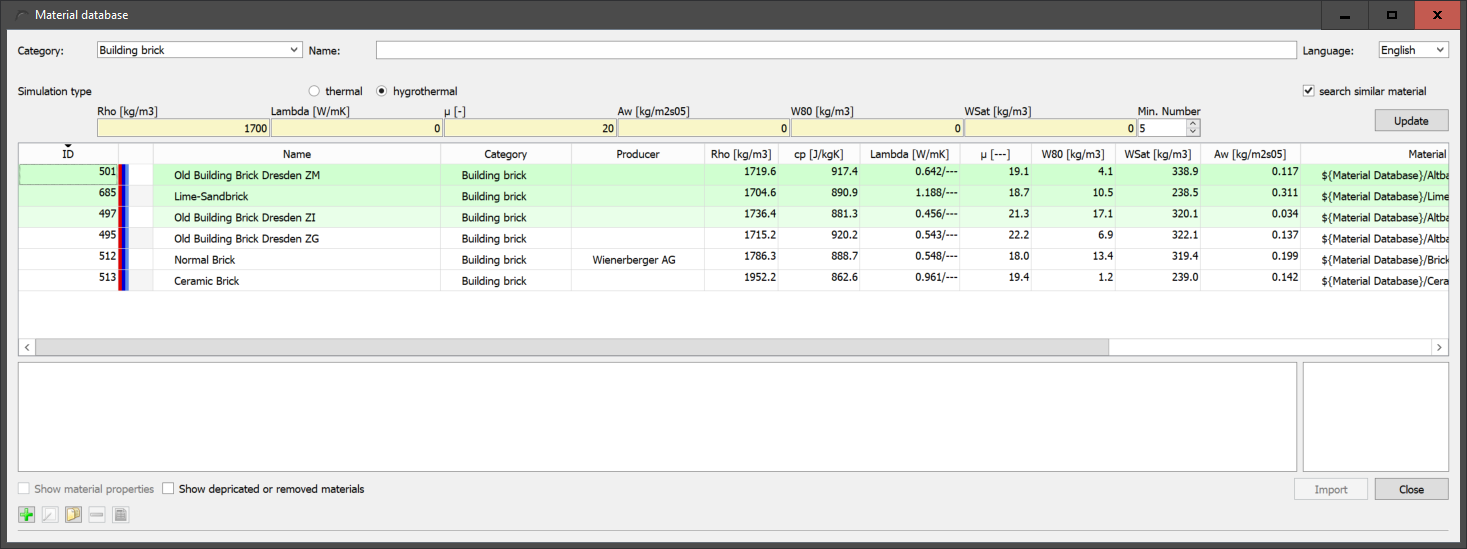
In the image above, we searched for bricks (category filter set to 'building bricks') with a density of about 1700kg/m3 and a µ-value of about 20. The minimum number set was 5. The filter picked out 6 materials with similar characteristic values. The background colour of the materials is adapted to the similarity to the entered characteristic values. The more similar the material is, the darker the background.
2.5. Language
At the top right of the dialogue there is also a selection field for the language. By default, the set language is used for the dialogue as well as for the material list. However, there are fewer languages available for the material database than for DELPHIN itself. If the database does not support the language, the list is displayed in English. With this dialogue box you can adjust this setting. However, this only affects the material names, the manufacturer names and the remarks. Currently the languages German, English and Italian are available.
3. Material table
The material table shows the materials according to the set filters. The following data is displayed in the corresponding columns:
-
Material ID
-
Colour code
-
Name
-
Category
-
Manufacturer
-
Density in kg/m3 (Rho)
-
Heat capacity in J/kgK (cp)
-
Thermal conductivity in W/mK (lambda)
-
Vapour diffusion resistance factor (µ)
-
Water content at 80% humidity in kg/m3 (W80) .
-
Water content at effective saturation in kg/m3 (WSat)
-
Water uptake coefficient in kg/m2s0.5 (Aw)
-
Path to the material file
You can sort by any data type except the path by clicking on the corresponding column header. Another click on the same column header reverses the sort order. Which column is currently sorted by is indicated by a small black triangle in the column header. In the picture this is e.g. the density.
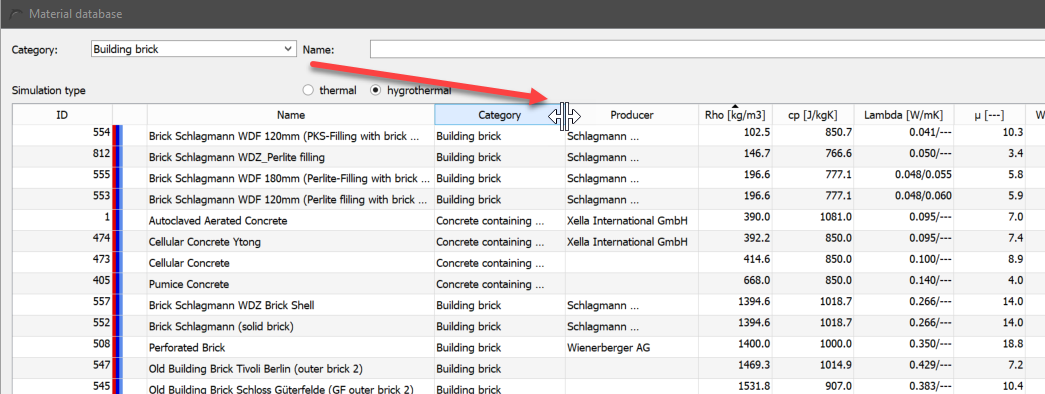
The column widths can be changed by moving the mouse to the line between two columns in the column header. The mouse cursor then changes as shown in the picture below. Then hold down the left mouse button and move the width of the column. DELPHIN remembers the widths set in this way for the next call.
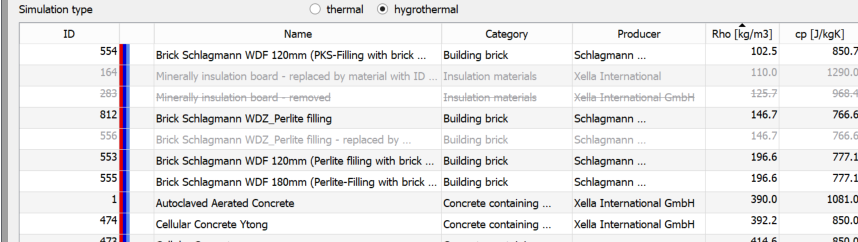
The background colour and font may also vary. Materials from the standard database have a white or light grey background. For user materials, the background is yellow. If the font of a material is grey, then it is an deprecated material. In this case, the ID of the material that replaces it is also displayed in the material name. If the font is grey and striked through, then this material has been marked as removed. Both material types should no longer be used. They are only included for reasons of compatibility with old projects. The visibility of such materials can be adjusted with the checkbox at the bottom left of the dialogue.
The material ID is a number that uniquely identifies each material record. This number is assigned by the central administration tool of the software manufacturer. Even if materials are removed from the database, this number is retained. This enables a precise allocation even for older projects.
The colour code shows the transport options available for the material. They have the following meaning:
| red |
Heat transport |
| dark blue |
Liquid water transport |
| blue |
Vapour transport |
| light blue |
Air transport |
The name and the manufacturer name are displayed in the language set in the dialogue. The category is always displayed in the language of the system.
Columns 6 to 12 show a selection of basic parameters to give an impression of the properties of the material.
4. Comments and dates
Directly below the table are two areas containing comments and dates for the currently selected material, if these are stored with the material.
The text in the comments is adapted to the language selected in the dialogue. This area can also contain a link to the manufacturer’s data sheet, if this is stored in the material. There are 3 options for the dates on the right:
-
Data set date - Date on which the data set (material file) was created.
-
Sampling date - Date on which the material samples were taken.
-
Production date - date on which the material was produced
5. Checkboxes for function graphics and deprecated materials
At the bottom left of the dialogue there are two checkboxes.

With the left selection box you can make a view of selected material functions visible for the selected material. The view then changes as shown in the picture below.
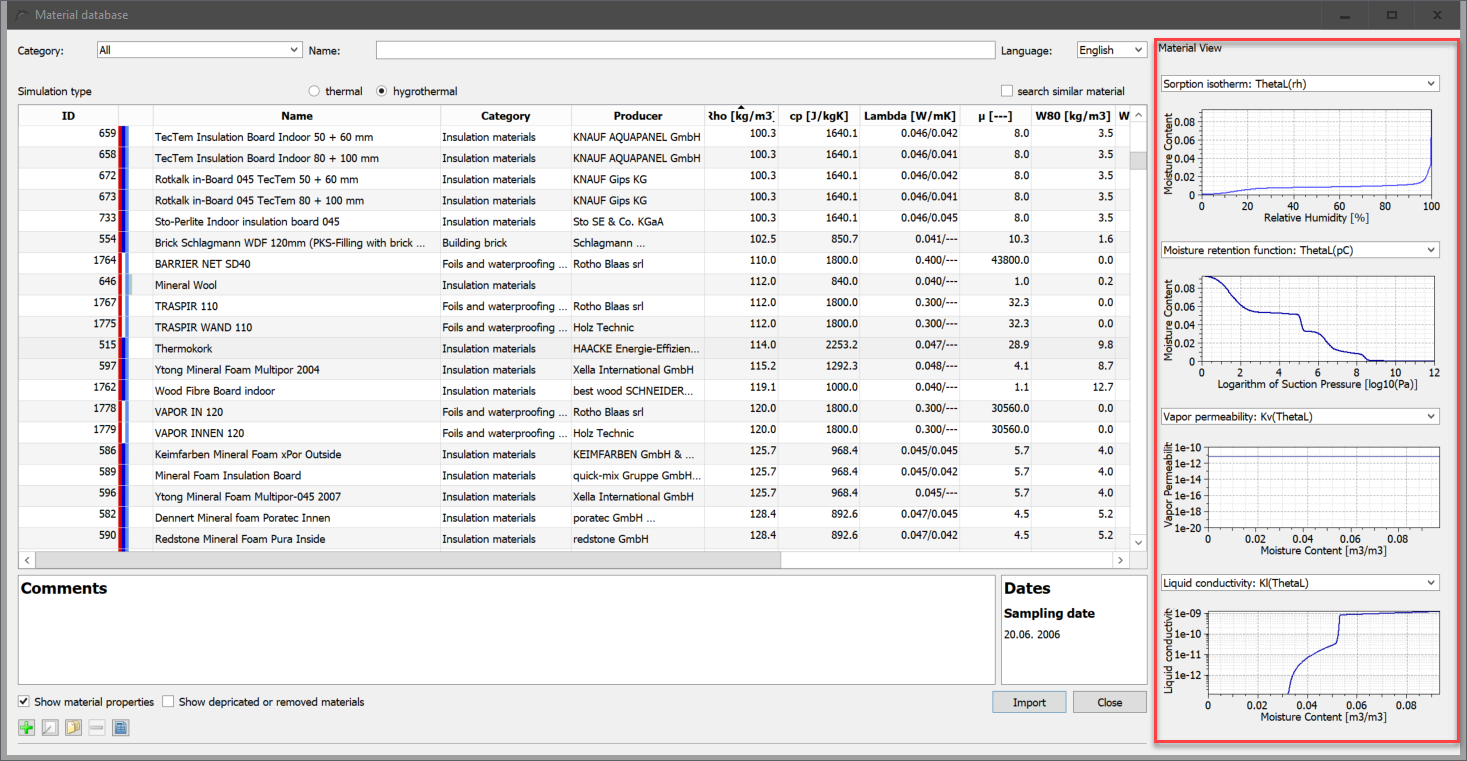
The following material functions are shown by default (from top to bottom):
-
Sorption isotherm
-
moisture storage function
-
Vapour conduction function
-
Liquid water conduction function
For a more detailed display, the material view should be used.
The second checkbox can be used to change the view of obsolete or removed materials. An explanation of this can be found here.
6. Editing user materials and material view
The buttons for editing the user materials and for the material view are located at the bottom left.
Buttons User Materials and View image::user_materials_1_en.png[user_materials_1_en]
-
Add new user material
-
Edit selected user material
-
Copy selected material and add it to the user database
-
Delete selected user material
-
Show material data for selected material (all databases).
The buttons are only visible when a material is selected. For button 4 (Remove), the selected material must be a user material. The procedure for clicking on one of the buttons is shown below:
6.1. New user material
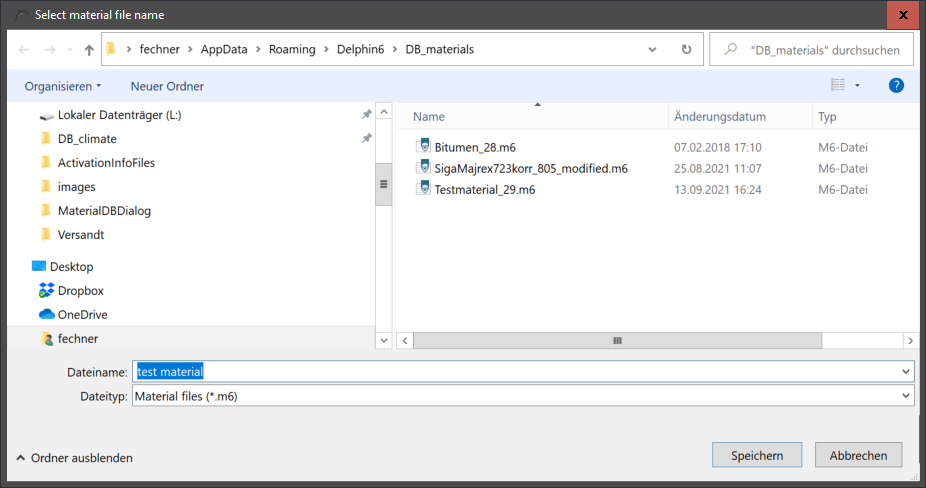
Immediately after the click, a hint window is displayed with instructions on how to design the file name. Then a file selection dialogue opens in which the directory of the user database is already open. Now the file name must be entered and confirmed.
After clicking on 'Save' the material file is created and then the editor is called up. First there is another hint box.
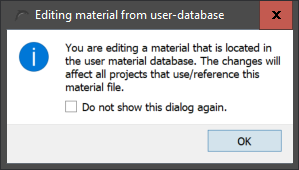
These hints can also be switched so that they do not appear the next time. To do this, simply tick the checkbox 'Do not show this dialogue again'. After confirming the hint box, the material editor opens with an empty material. All necessary information must now be entered here. Notes on the material editor can be found here:
6.2. Edit selected material
When you click on this button, the further process depends on whether a user material or a material from the built-in database is selected. If it is a user material, the material editor is simply opened with this material. In the other case, you are first asked whether the selected material should be copied. If yes, a new material file is created, which can then be edited.
6.3. Copy selected material
The procedure here is similar to creating a new material. Here too, a new material name is first defined and then the material editor is opened. In this case, however, the data of the previously selected material is already available and only needs to be changed. This simplifies the material creation somewhat compared to the complete new creation.
6.4. Delete user material
This button is only active if the selected material is a user material. After clicking, there is only a short query whether the material should really be deleted.
6.5. Material view
After clicking on this button the material editor is opened with the data of the selected material. However, it is not possible to edit the data here.